Klättermusen Einride EtaProof Mountain Jacket Review

Overview

About two years ago I got interested in a material I wasn’t quite familiar with: Ventile. Ventile is made from an extremely tight weave of long-staple cotton and was invented in the 1930s and used extensively in the Second World War for fighter pilots bailing out of their airplanes over the English Channel. At the time, waterproof technical textiles did not exist but the Allies were losing too many pilots at sea so a solution had to be found. They started to make floatation suits out of a material previously used for fire hoses.

When woven tightly, long-staple cotton fibers swell when wet and block moisture from seeping through. In single layer fabrics, this does not become fully waterproof, but when combined with a second layer of fabric, it does. Other pros: it is durable, breathable and won’t melt near a fire when an ember touches its surface.

Obviously, bush crafters, survivalists, mountaineers and other outdoorspeople were quick to discover this fabric. Various outdoor gear brands have been making clothing (especially shell jackets) out of this fabric for decades. Cons: it’s relatively heavy (especially the double layer version), expensive, stiff when wet and none-stretchy.

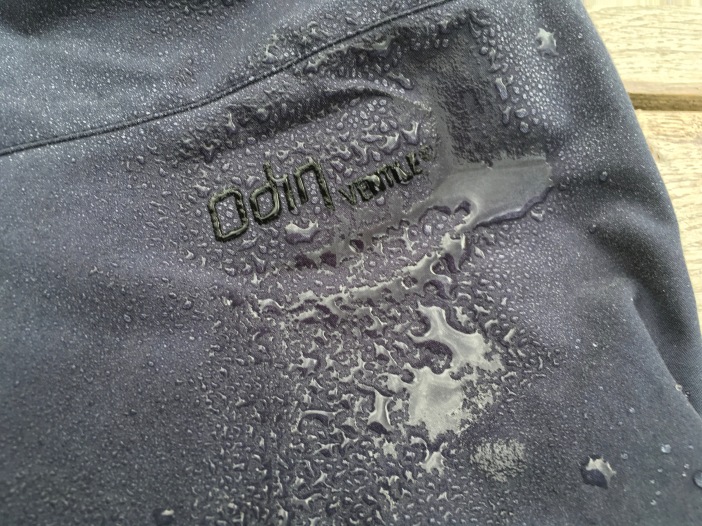
My research led me to invest in a Tilak Odin Anorak. This is a Czech-made Ventile pullover style jacket with ample room for winter layers underneath and a clean look. While I like it for everyday life and hiking and trekking in winter, the roomy fit and small(ish) hood  kind of makes it unusable for technical mountain stuff. Also, anoraks tend to get annoying after a couple of weeks of use in urban life.

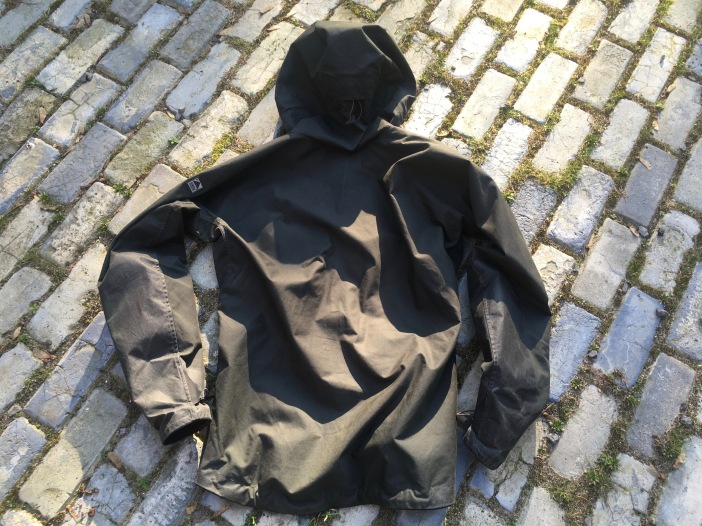
However, the feeling of the fabric is superb, especially because it is super durable and ages gracefully. So, I decided I also wanted a jacket made from the same material. First step was to get rid of some jackets and other gear I was not using often or didn’t spark joy anymore. Thanks to the decent second-hand market for high-quality outdoor gear that wasn’t too difficult.

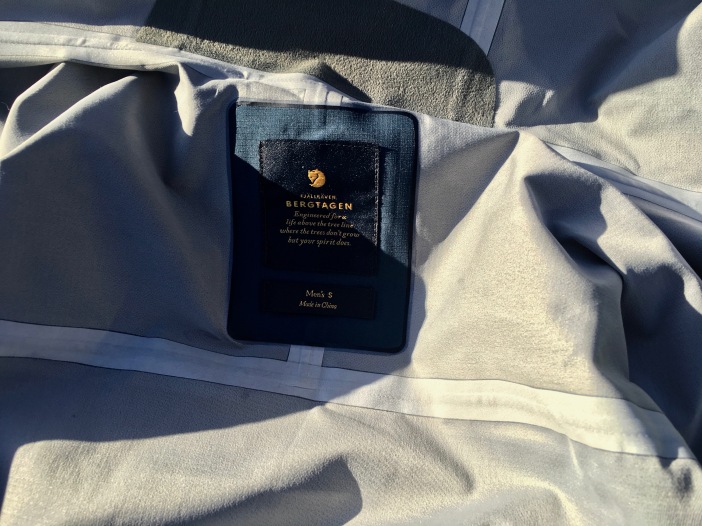
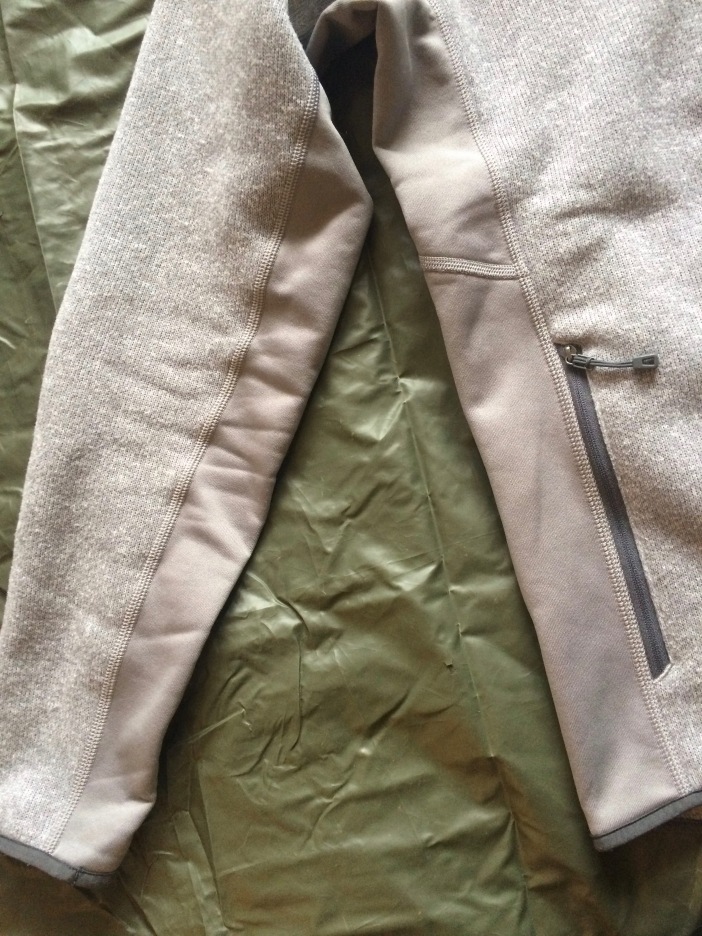
Second step: investing. My eye fell on the beautiful Klättermusen Einride Jacket, which I was able to get for a steal, because the brand’s website had one piece left of an old production run in exactly my size and color. Lucky me!

Klättermusen Einride Logo Detail.jpeg

Construction

‘Cotton kills’ is such a ubiquitous expression in the outdoor community that we often do not give it much thought. That is because, by and large, the expression is true. When you go into the mountains fully dressed in everyday cotton jeans and midlayers and you are caught in a freezing drizzle or downpour in the colder seasons you’re pretty much done for.

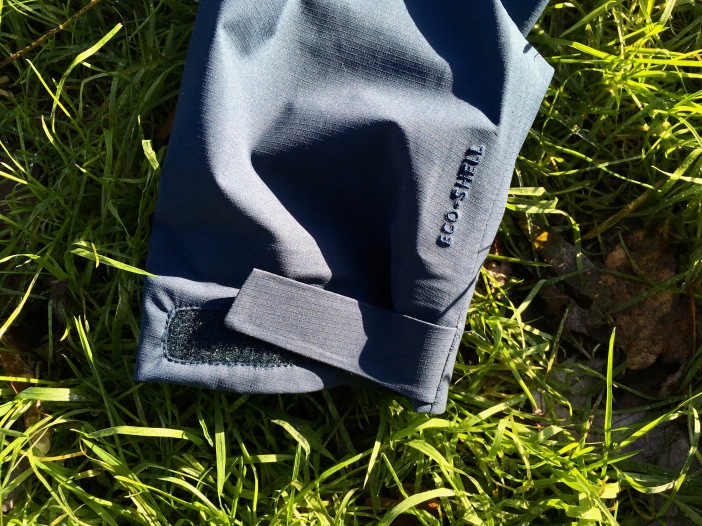
There are, however, a few exceptions: Ventile and EtaProof. Both of these fabrics swell when wet and act as a barrier between you and the wind and rain. As a single layer, these fabrics act as any good softshell fabric should, and when combined with a second layer, they become waterproof. Ventile is basically the granddaddy of technical waterproof-breathable fabrics. EtaProof is essentially the same but made in Switzerland instead of the UK. For a number of their garments, Swedish company Klättermusen has decided to work with EtaProof.

EtaProof is made from 100% organic cotton, which is nice because these high-quality cotton fabrics can only be produced from the top 2% best cotton of worldwide production – can you imagine the amount of fertilizer and water it would take to do that in a non-organic way?

The cool thing about Ventile and EtaProof is that it not only works well in the outdoors, it also looks very good. It does not have any of the plastic look and feel of traditional shell materials and it also ages nicely. It cannot delaminate or crumble and it will not rip as easily as a thin softshell or hard-shell material. All in all, it is a very good material for hard-use cases. Just bring a lightweight rain jacket as a backup, but you’ll probably not use it much…

The construction of the Einride is top-notch, as you would expect from a premium brand like Klättermusen – high prices in the outdoor industry tend to be quite a good indicator of quality (although marketing does rear its annoying head sometimes as well).

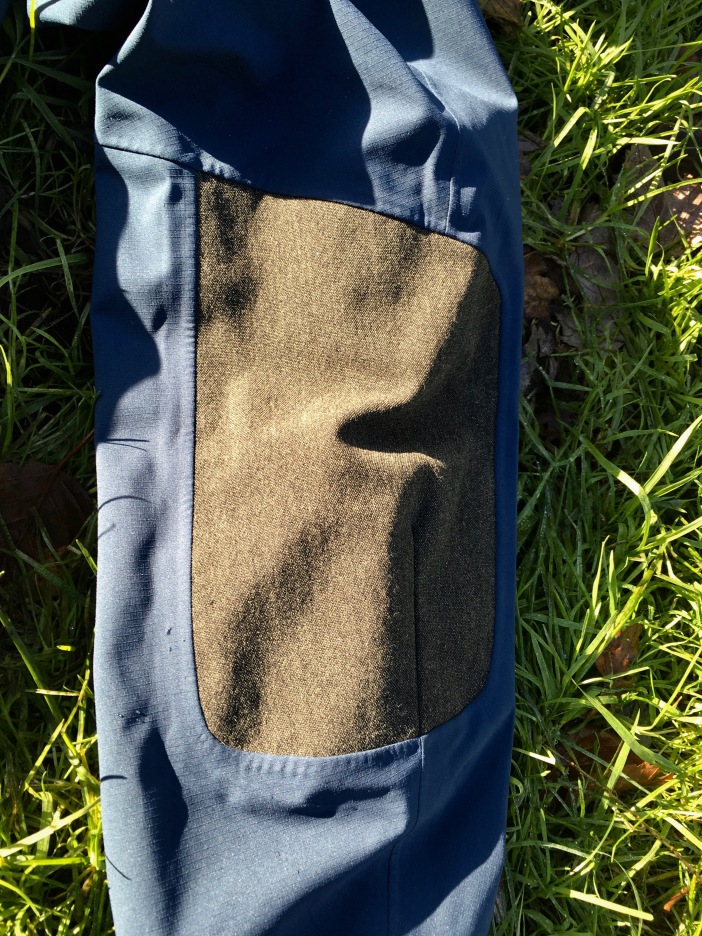
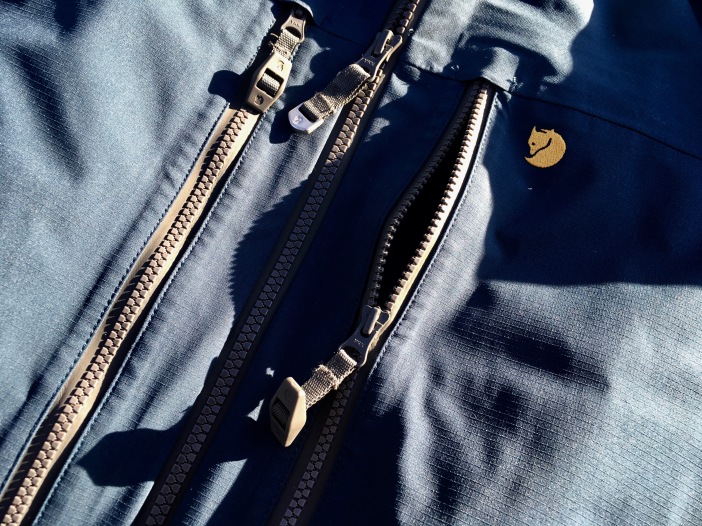
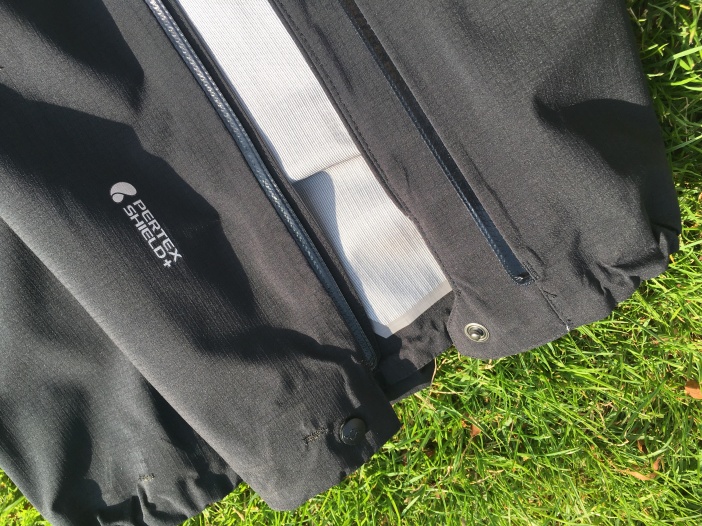
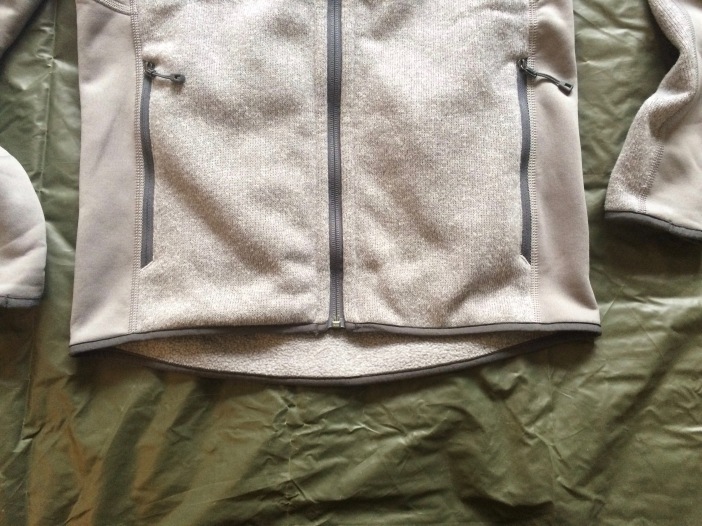
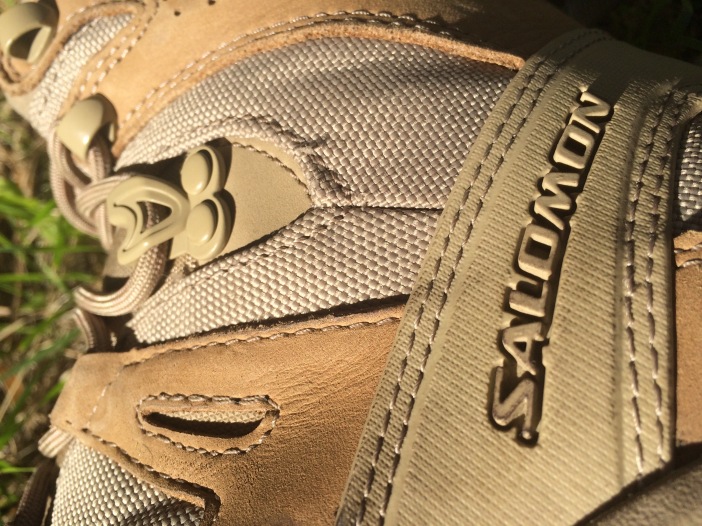
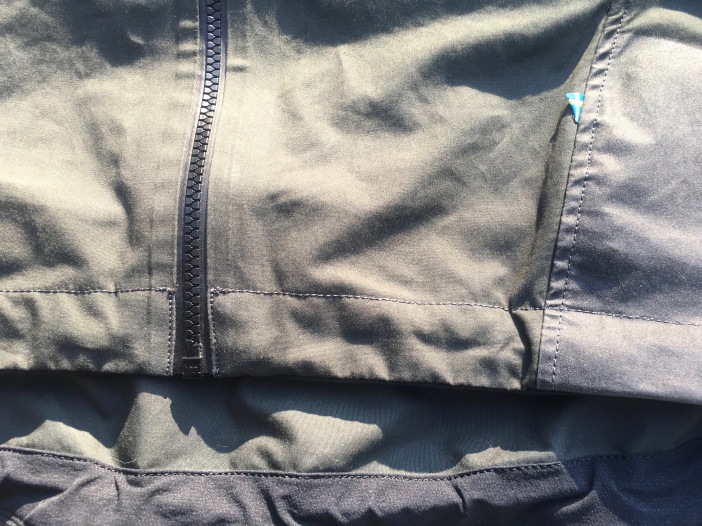
Essential seams have been taped for increased water- and wind protection, and the zippers are all YKK Aquaguard of the newer generation with the exposed teeth. The hard-wear areas have been reinforced with DuraCoat, a proprietary coating technology developed by Klättermusen, increasing the abrasion resistance of these areas up to five times. As this is a mountain jacket in design, these reinforced areas are the lower sleeves up to about the elbows, and the side of the hips. Stitches are superb throughout with ample bar-tacking and double stitches when necessary.

Klättermusen Einride Front Zip.jpeg

I like how Klättermusen’s designers have opted for the KISS approach to the features of this jacket, as that makes sure that any unforeseen problems are mendable. It also creates a clean look that doesn’t stand out on the streets. That is not to say that this is not a technical jacket, but more on that in the next section.

Features

While this jacket looks super clean it comes as equipped for the mountains as any technical shell should! We’ll start at the top and work ourselves to the bottom of the jacket.

Klättermusen Einride Hood Back.jpeg

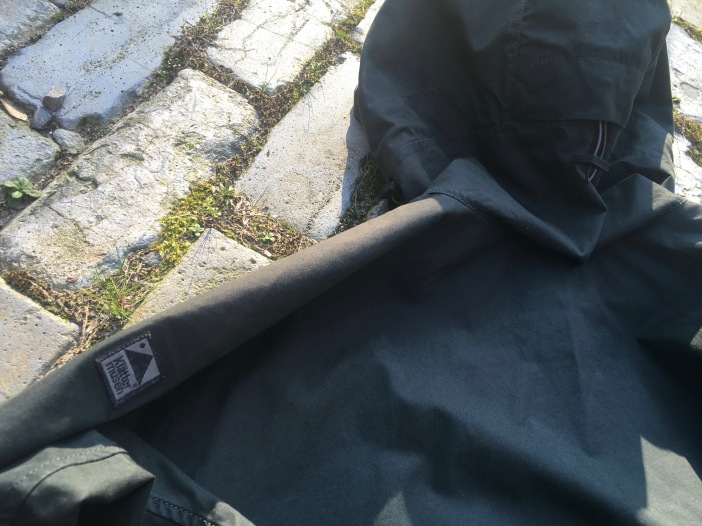
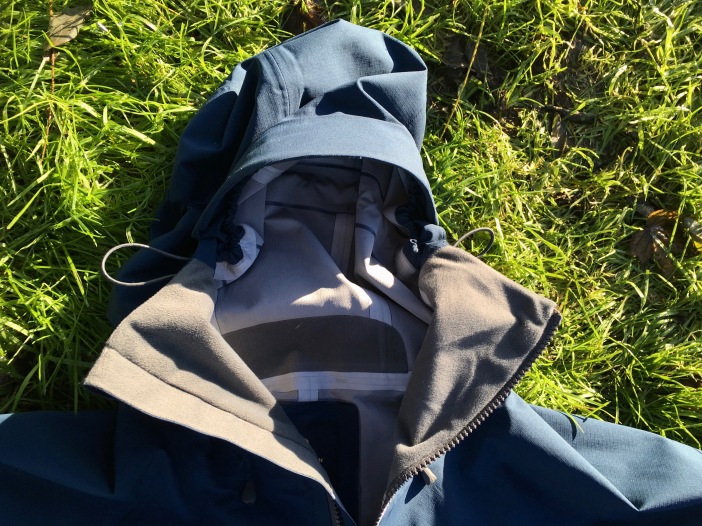
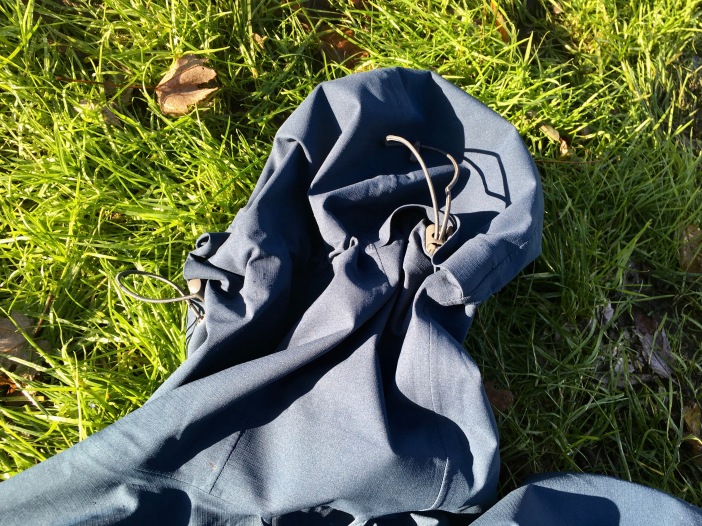
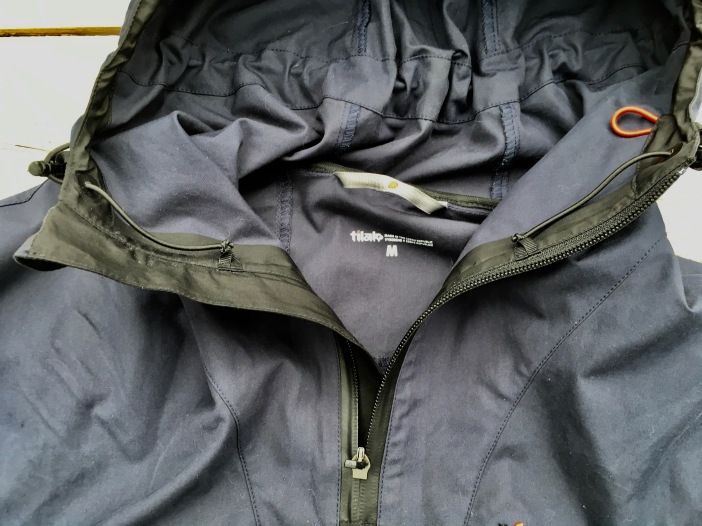
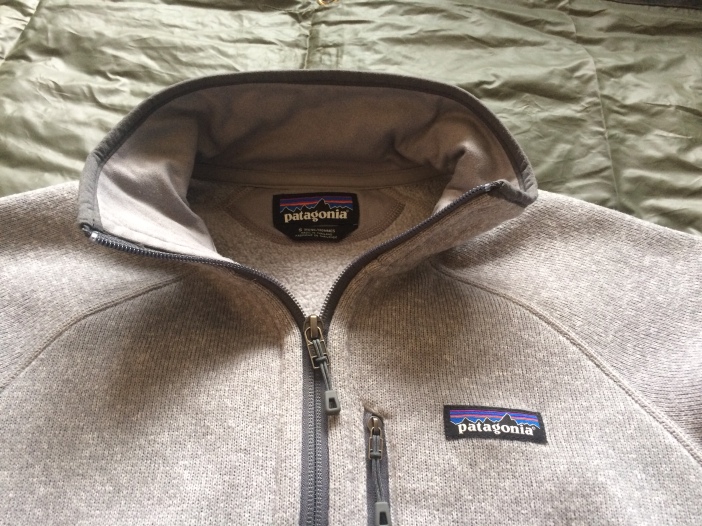
First up is the hood. As Klättermusen is a mountaineering brand in spirit and practice – the name literally means Climbing Mouse – the hood is fully adjustable, roomy enough for a climbing helmet and fully patterned to follow your head whichever way you move. The adjustment dials are operable with one hand, although they are a bit different from those seen on most other jackets so they take some time getting used to. Definitely make sure you know how they work before you take a trip to the mountains! The brim is laminated and shaped to keep rain and snow off your face while moving. In design and feel it is comparable to the climbing hoods seen on Arc’teryx or Rab jackets, but less with the snorkel hoods you sometimes see on other Scandinavian brands such as Fjällräven, Lundhags or some other Klättermusen jackets. I like it like this, it is a more dialed-back design that is more controllable when not worn.

Klattermusen Einride Front Pocket Zip.jpeg


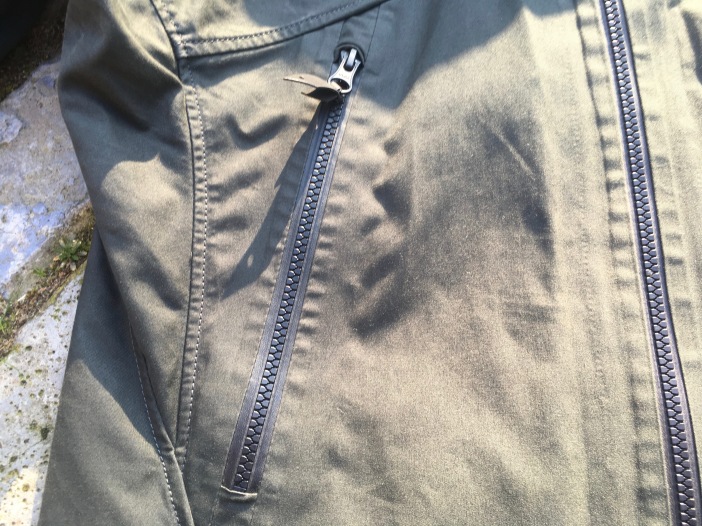
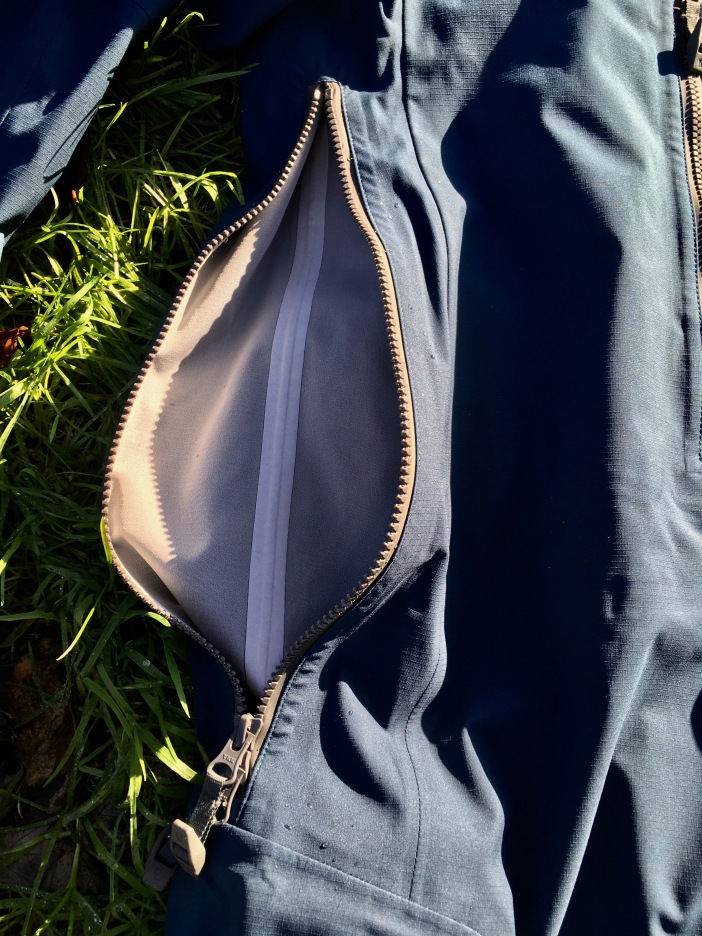
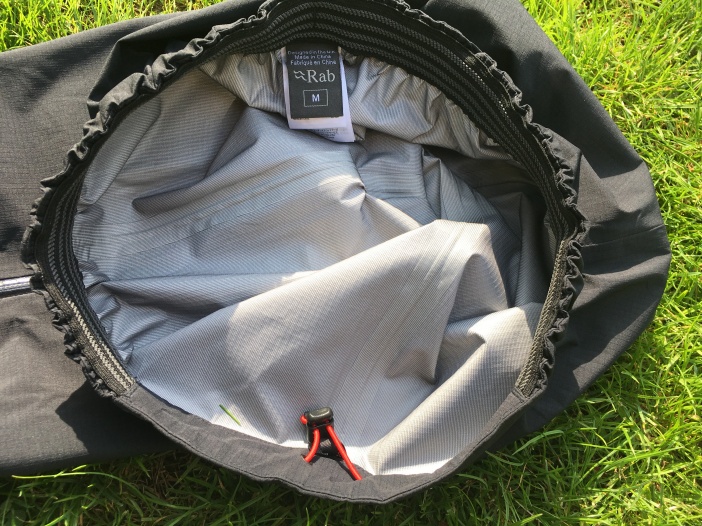
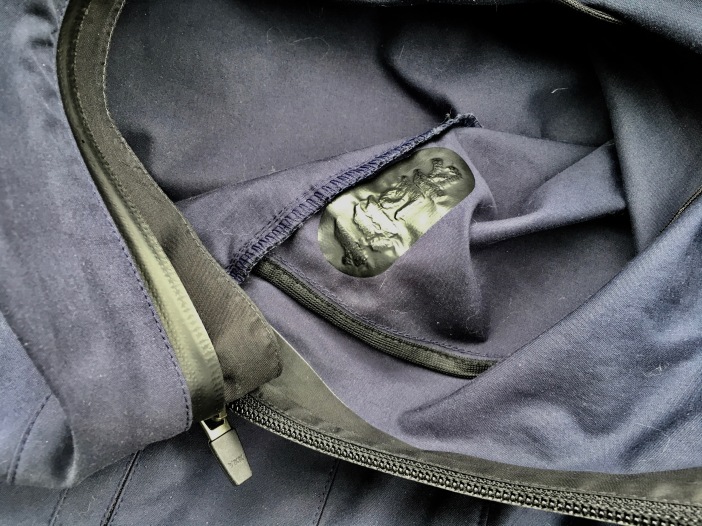
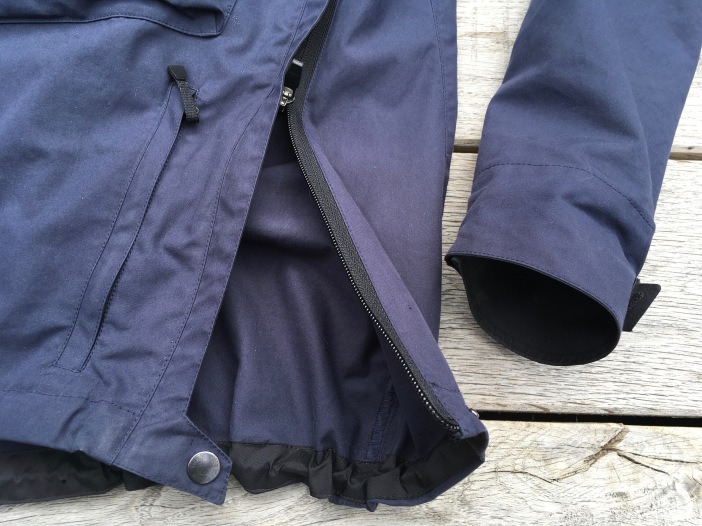
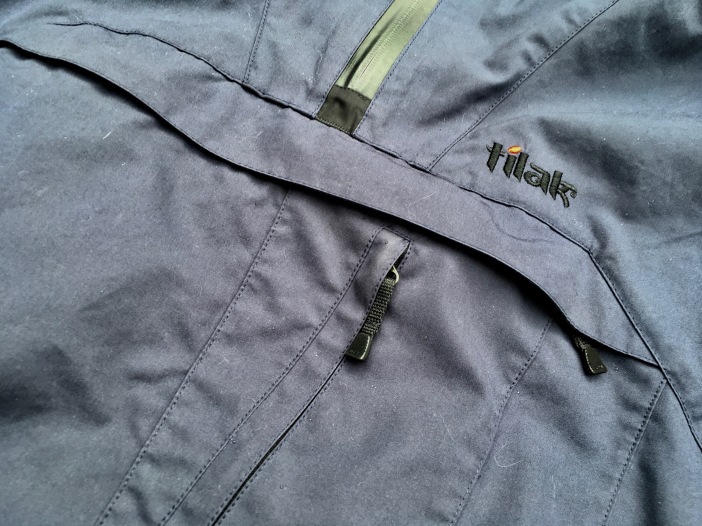
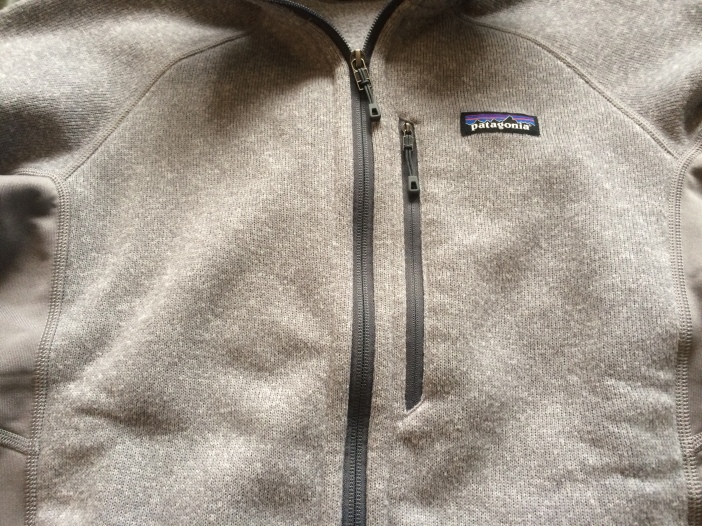
Next up are the pockets! This jacket has three, one on the inside and two on the outside. They are placed high up, so as not to interfere with a hip belt or climbing harness. The outside pockets are big enough to carry gloves, beanies and neck gaiters, or other essentials. They are lined with mesh so they can also act as ventilation ports when it is warmer or you are moving faster or uphill. No other vent zips are present. Again, the zippers are YKK Aquaguard with exposed teeth. The inner pocket will carry a small smartphone or wallet, but not much more.

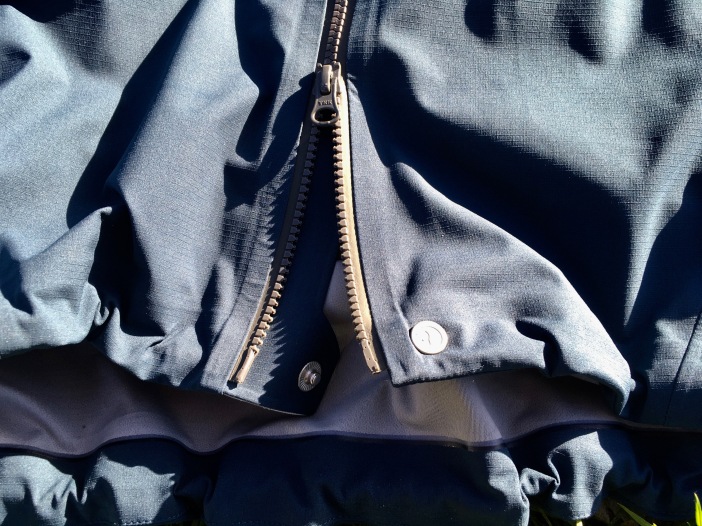
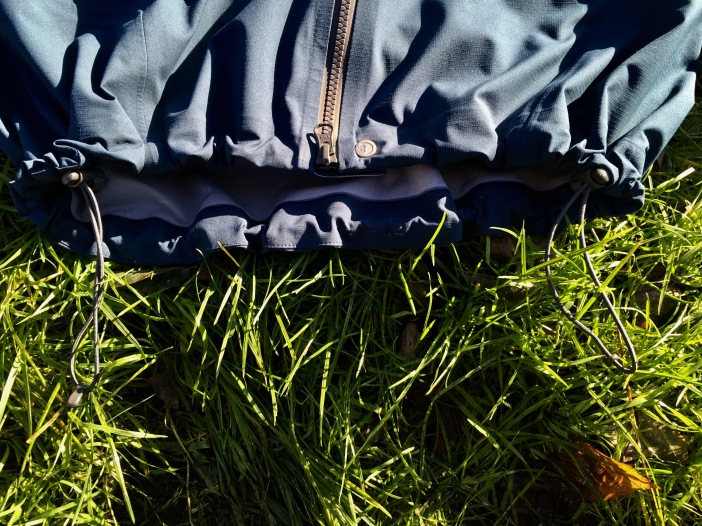
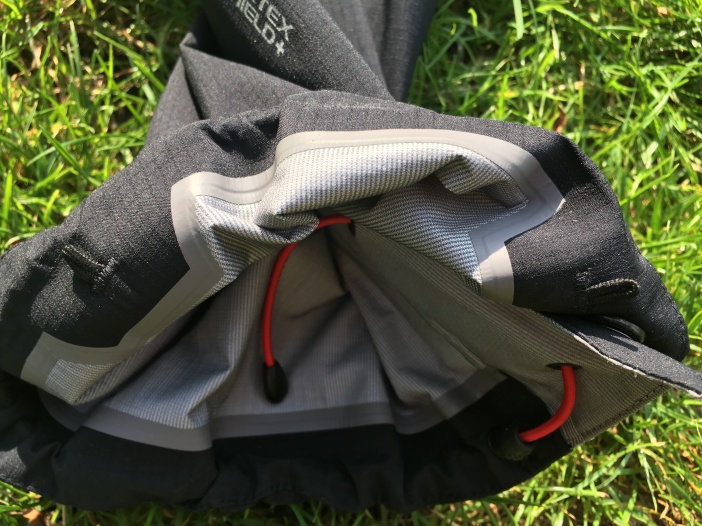
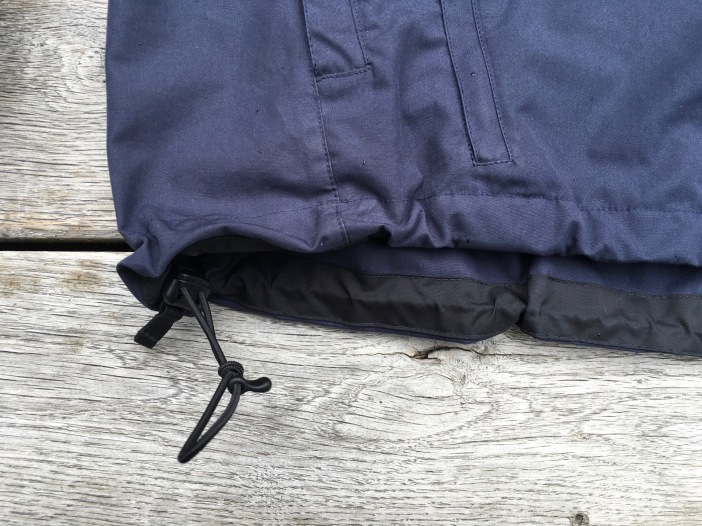
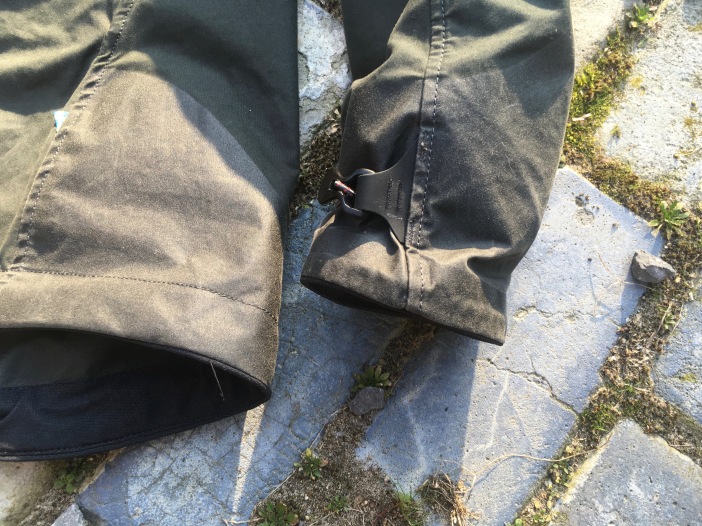
The bottom hem is adjustable and the sides are reinforced with DuraCoat to make sure your climbing hardware or pack belt does not rub the EtaProof directly.

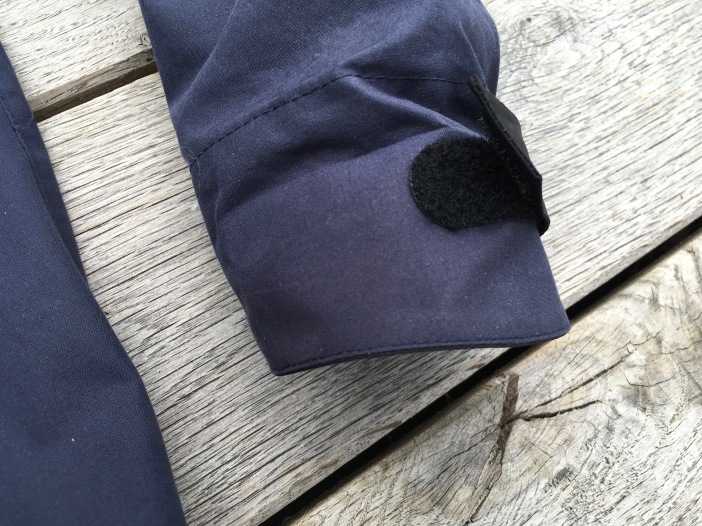
The sleeves are pre-shaped, reinforced with the same DuraCoat as the hem, and feature nifty sleeve adjusters that forego Velcro or elastic sewn into the fabric but work with a little bit of elastic string and a plastic buckle – again, easily replaced when worn out.

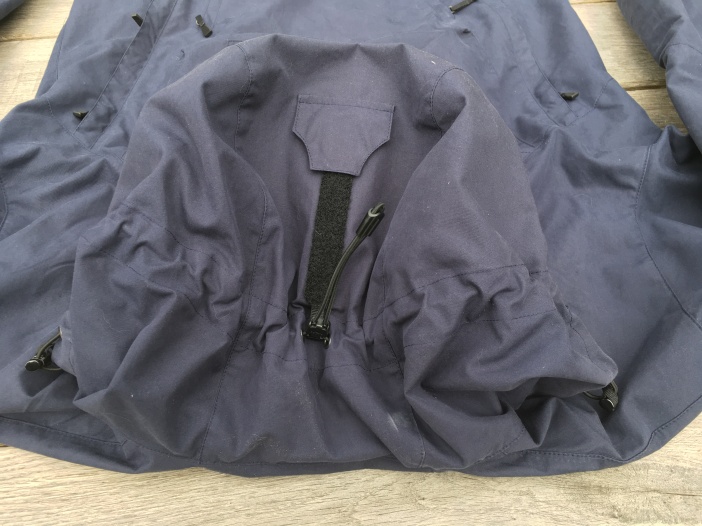
The single-way main zip is slightly asymmetric, one of Klättermusen’s design cues. It also feels quite comfortable as the zipper runner isn’t right in front of your chin when you are all buttoned up. Of course, the back is fleece-lined.

Klättermusen Einride Wrist Adjustment.jpeg

Fit

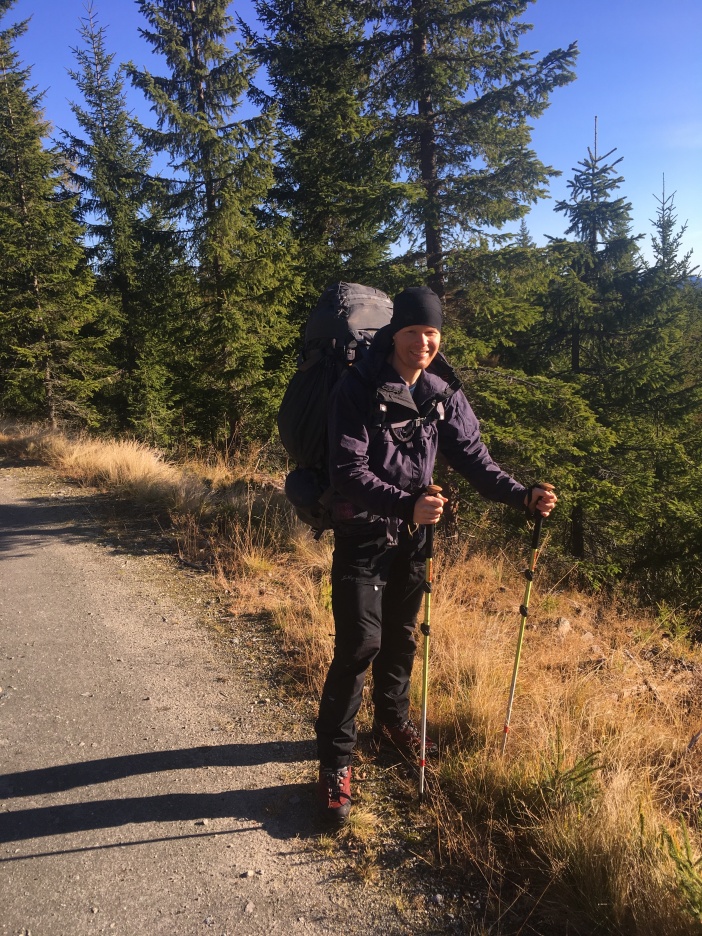
Klättermusen has really designed this jacket with a technical layering system in mind. It fits perfectly with a base- and mid-layer or a base layer and a thin puffy jacket, but works as well with just a base layer. I am able to squeeze a thin down vest on top of a fleece as well, but that is pretty much the limit. A reinforcement jacket will easily fit over the jacket and midlayer while belaying or resting. The patterning is great. The raglan sleeves are lengthy enough for climbing and don’t make the jacket ride up while lifting your arms over your head. I am 1,78m and weigh about 72kg with slightly long arms for my length and size Small is perfect for me.

Usage

Basically, this jacket is ready for anything. The patterning and feature set will make it function in the wild while mountaineering, hiking, or bush crafting – although the last group might prefer a jacket with more pockets. The clean look will make sure it doesn’t stand out too much on the street (except for those who know what to look for…) and the weatherproof EtaProof material will make it attractive in a wide range of temperatures and weather conditions.

The only drawback I can think of is that it will not perform as well on very wet and cold spring or fall days while camping, as cotton dries quite slowly – although long-staple cotton has a quicker drying time than your everyday jeans.  This will be less of an issue in the summer or winter Alps, when staying in huts is par for the course. Also, when combined with natural mid-layers made from wool (warm even when damp) I’d say you’re good to go for slightly wetter adventures as well, provided you’re not camping. I’ve been using the jacket in everyday life in variable conditions for a few months now, and it only wetted through on the inside of my elbows so far – in pretty heavy rain I might add.

Klättermusen Einride Back.jpeg 

Pros

Full mountain feature set

Looks clean

Feels great

Durable and reparable

Windproof and water resistant

Safe to use around a camp fire

Dries faster than normal cotton

Cons

Costly

Not the lightest option out there

Stiff when wet

Cotton still dries slower than synthetics

Overall

All in all, I would say that this is the most versatile none-waterproof jacket that I have ever worn. It performs well with a range of layers, is water resistant and windproof enough for daily use and hardwearing enough for abuse. Its technical feature set makes it usable in a mountaineering setting, and its subdued look makes it good for the street as well. It does not feel like a plastic bag, does not sound like a bag of crisps, breathes well and is patterned for movement. If you’re going to own just one softshell and are not a gram-obsessed person, make it this one.


Further reading

https://www.klattermusen.com/en/men/jackets/10607m81-einride-jacket-mens-charcoal/


Lightweight is (not always) the best weight

I’m sorry it’s been a bit quiet here in the last few months, but I have my reasons (good, positive ones for the most part…).

In May I went to Montenegro with my girlfriend and did some wonderful day hikes around some of the mountain ranges in this beautifully diverse little country. I definitely want to return there some day to explore some of them a bit more, and for longer. I have the feeling some of the ranges would present some fun climbing and mountaineering in the early summer season, especially Komovi and Prokletije (the latter we regretfully did not have time to visit). My dream would be to trek in, make a base camp and go nuts for a few days. Now to find the time…

Montenegro Komovi Panorama

In July I went to Austria to attend an introductory mountaineering course organized by the Dutch alpine society NKBV. I was lucky enough to be able to attend their combined course and alpine tour. This enabled us to really take the time to drill certain crevasse rescue techniques – both self-rescue and buddy rescue. This two-week period was a great learning experience and it has definitely left me yearning for more, even though some of the vistas were of… debatable quality…

Wildspitze Summit.jpg

And last but certainly not least, in August I participated in Fjällräven Classic Sweden, a week-long trekking festival in Lappland, held each year. This really is a community event and a great introduction to trekking for those new to the activity and a really fun event for those already familiar with hauling their home on their backs (which includes yours truly obviously).

Fjällräven Classic Kebnekaise.jpg

For those familiar with trekking in rough conditions, it is not the biggest challenge ever, although the fickle arctic summer weather and the exposed terrain can make it tough nonetheless. Outside of the context of Fjällräven Classic I would never advice anybody to take their first multi-day trekking trip into Northern Sweden as the weather and terrain can and will make it very unpleasant indeed, and might make a beginner very uncomfortable if not downright unsafe.

Now, especially my two weeks in Austria have taught me a thing or two. Aside from the obvious complicated hauling systems and rope techniques (which I will have to repeat a million times more to truly master), the one take-away for me was the importance of low packing volume of gear – especially in summer.

North Face Summit Series Alpine 50 Fully Loaded.jpg

Especially in the alps, though, I underestimated the amount of time certain pieces of gear spend in your pack: harness, wind jacket and rain jacket only came out very sporadically. This is more or less obvious for the latter two, but my harness was a chunky Black Diamond sport climbing harness. Really comfy to rappel in, belay in or just hang into, but during glacier travel and especially when in my pack, it was big and heavy and, when worn, cumbersome to combine with a backpack belt.

Which led into an orientation into ski mountaineering harnesses. I eventually picked up an ‘old’ orange Black Diamond Couloir, which I was able to find for a fair price new at retail. It’s one of the last ones of these produced in 2015, so theoretically usable until 2025 – which is longer than the practical lifespan of a harness anyway. It’s 1/3rd the pack size of my sport harness, and about half the weight. Quite an improvement, and I really dig the bright orange color.

Another space saver is a proper windbreaker jacket. Softshells are really comfy and versatile but when the weather forecast calls for mostly sunny weather they do take up a lot of pack space – although I still prefer them when there is a big chance of changeable weather.

When wind is the main issue, the Patagonia Houdini Jacket is truly a magic trick. Weighing 100 grams and stuffing into a built-in pocket smaller than a big banana, this jacket is windproof and is capable of shedding some precipitation as well, all while remaining quite breathable. Its small weight and pack size means that it is about five times as space efficient as a traditional softshell. But when you combine it with a thin fleece, it is about as functional.

Then there is the issue of actual waterproofs. Superlight rain gear is available nowadays from as light a weight as 170 grams for a jacket. But the tricky thing is that sometimes your rain gear gets used with a heavy backpack (especially when you’re bivouacking, trekking, or setting up and operating from a base camp of sorts). My Fjällräven Bergtagen Eco-Shell Jacket is a wonderful piece of waterproof-breathable wear for heavy-use situations. It is also of acceptable weight for those summer days when rain isn’t in the forecast and it will spend 90% of its time in your 50-liter alpine pack. The only thing it doesn’t do very well is being part of a superlight summer kit. My kit dream is to be able to do a technical, cabin-to-cabin alpine trek with a 30L-ish pack. Doable, but only when everything packs down tiny. However, I still want it to be full featured, ie. helmet-compatible hood, 3-layer laminate, large pockets that are usable while wearing harness and/or pack belt, vent zips, and, most importantly, not feel like a plastic bag.

Now, I originally planned to postpone this purchase a little, as 3-layer hardshells can go up in price quite a bit, especially when they need to be lightweight. But it being sales season for most of the big retail chains over here means that I was able to pick up a Mammut Masao Light HS Hooded Jacket for a bargain. This jacket seems to have all the bells and whistles I need for about 3/5th the weight and size of my Bergtagen – perfect for lightweight summer alpine trips. I haven’t read any extensive reviews online either so I’ll write one up as soon as I have put it to use a bit. However, I still think I will take my Fjällräven hardshell on mini expedition style trips, long treks, and when the forecast is less favorable – or plain bad.

So I went on a tiny spending spree… Looks to be money well spent though, as I’ll use all of these items on future trips and adventures and I can mix and match all of these pieces of gear depending on my needs.

Now, time to plan the next mountain adventure!


Fjällräven Bergtagen Eco-Shell Jacket Review

Overview

Fjällräven has been making quality gear for over sixty years now, but one relatively recent addition to their line-up is properly waterproof high-performance gear. While waterproof apparel has been in their collection for quite some years, 2015 saw the introduction of a revolutionary new material: Eco-Shell (or, technically, Eco-Shell 2.0: They already released a previous version in 2011). Why this material is so ground-breaking is a question I will return to later.

When Eco-Shell 2.0 first came out I tried the Keb Eco-Shell Jacket for a while. I liked it in terms of fit and feel, but to me it had one major drawback: My climbing helmet barely fit underneath the hood. Fjällräven claims that a helmet should fit but I just did not have enough room for movement – quite annoying when you’re pushing uphill. I sold it after about half a year of use and switched to one of Fjällräven’s main competitors: Arc’teryx. Until recently, their hood design was unrivalled. I say ‘until recently’ because the Swedish crazies from Övik came up with the Bergtagen Collection: a concept built for technical mountaineering, alpinism and back-country skiing. Anxious to find out if this system of clothing is all that it is cracked up to be? Please read on…

Fjallraven Bergtagen Eco-Shell Jacket Helmet Compatible Hood.jpg

Construction

As I’ve come to expect from the Swedes, the construction is technically top notch but straightforward. Where some brands can go a bit overboard with features, Fjällräven tends to be simpler and more barebones in their approach, especially with their technical apparel.

Let’s start with having a look at the major identifier of this jacket: The main material (bear with me here…).

As I’ve said before, Eco-Shell is quite the revolution in the outdoor industry. Where most waterproof-breathable apparel throughout the market is made from Gore-Tex or some sort of copy of that American powerhouse, Eco-Shell is different, especially in Version 2.0.

Gore-Tex advertises with the slogan ‘Guaranteed to Keep You Dry’. Rightly so. Their materials are inherently waterproof because the microporous membrane does not let water through from the outside. Now, Gore-Tex (or any other microporous membrane really) remains breathable because the material contains microscopic pores – hence the name. These pores essentially are super-small holes in the material that let water vapour through from the inside, preventing the quick build-up of sweat and heat.

Gore-Tex is made from stretched PTFE, short for Polytetrafluoroethylene (you can forget that and call it Teflon). You’re likely to be familiar with this: it’s used around the house in tape form to waterproof faucets and showerheads.

In most garments, it is laminated to a polyamide outside and in most cases a protective inside coating as well (hence the industry mumbo-jumbo about 2, 2,5 and 3-layer clothing). Then, the face material gets a durable water-repellent coating made from PFC (perfluorocarbons). This makes water bead off of rain jackets. This construction has essentially remained the same since the material’s invention in the sixties and seventies. Of course, the layers have become thinner, stronger and more breathable. But the main concept has remained the same.

While it works reasonably well in temperate to cold conditions, this set-up has one major drawback: it totally destroys the environment. Most Gore-Tex or Gore-Tex copycat clothing consists of multiple textile materials (polyester, polyamide, PTFE and sometimes more). This makes them virtually impossible to re-cycle. Furthermore, Teflon production involves numerous extremely harmful chemicals, which can lead to cancer if not properly worked with. To add insult to injury, PFC-made DWR’s are harmful to nature because they take an extremely long time to break down and are poisonous to small animals and, because they linger and build up, the rest of the food chain.

Then there is the inherent technical drawback of microporous membranes: because they are basically a super-thin plastic layer with tiny holes they are susceptible to wear-and-tear and their breathability is limited.

Eco-Shell 2.0, especially the 3-layer variant, avoids most of these issues. While Eco-Shell 1.0 essentially was a 100% polyester microporous membrane with a PFC-free coating (which already is a lot better than PTFE membranes coated with PFC’s), Eco-Shell 2.0 improves upon the first edition in a couple of important ways.

Number one is the basic technology used: Eco-Shell 2.0 is a hydrophilic membrane. That means that it is actively sucking away excess moisture from the skin. This makes it much more breathable than a microporous membrane. Whereas microporous membranes rely on mechanical transportation of water vapour, hydrophilic membranes chemically suck it away from the inside out. The difference is very noticeable when working hard or when the temperature rises.

Number two is that Eco-Shell is a mono-material: the entire garment is made from partly recycled polyester (details such as zipper runners excluded). This already was the case with Eco-Shell 1.0, but not so much for most other waterproof-breathables. Mono-materials are easier to recycle than garments in which multiple types of plastic need to be separated before melting them down. Also, polyester membranes tend to be stronger and therefore longer lasting than PTFE membranes.

Number three is the total lack of PFC DWR. Fjällräven works with DWR’s with a shorter carbon-chain. This makes them significantly less harmful. Granted, most brands are currently ditching PFC’s. That’s a good thing. The only drawback is that PFC’s are extremely water-repellent, and PFC-free DWR’s thus need to be replenished more often.

Number four is a CSR-related choice made by Fjällräven to climate-compensate production and transportation of Eco-Shell, meaning that it is completely CO2-neutral when it ends up in the customer’s wardrobe.

Last but not least, polyamide-reinforced PTFE membranes tend to feel like wrinkly and noisy plastic bags. This is because the membrane needs plenty of reinforcement to remain reasonably durable. Normally this is done by adding a layer of polyamide in a thickness dictated by how strong the garment needs to be.  Eco-Shell apparel uses polyester instead. Polyester is much stronger, more pliable and softer, and hence not nearly as loud when moving around. It is also easier to recycle, as mentioned before. It is heavier than Teflon and polyamide though, so that comes at a small weight penalty.

To me, Eco-Shell is a major improvement over most other waterproof-breathable materials. Now let’s discuss why the Bergtagen Eco-Shell is such an improvement upon all the other Eco-Shell jackets in the Fjällräven line-up.

Features

First up: the hood. Whereas Fjällräven’s other shell jackets feature hoods designed with hikers and trekkers in mind, the Bergtagen Eco-Shell’s hood has been designed for one purpose only: to fit a mountaineer’s helmet with room to spare. In many ways, it is very similar to Arc’teryx’s Stormhood design: it is two-way adjustable, very roomy and has a laminated brim. However, there also are some major differences: the collar is higher, meaning that it offers more protection from harsh winds. Also, the entire front is lined with microfleece for a soft feel and warmth.

Fjallraven Bergtagen Eco-Shell Jacket Helmet Compatible Hood Adjustable.jpg

Second, it is made from 3-Layer Eco-Shell RipStop fabric, meaning that the outside material is a lot harder-wearing than the Keb or Abisko Eco-Shells. Furthermore, it features elbow patches made from Corylon, an Aramid-based fabric developed in-house by Fjällräven to be immensely strong yet very pliable.

Fjallraven Bergtagen Eco-Shell Jacket Corylon Elbow Reinforcements.jpg

The third major difference between this one and the rest of the Eco-Shell line-up: zippers. Bergtagen products feature very tough zippers, laminated ones on the Eco-Shells to make them waterproof. Also, they feature innovative pullers to make them easier to manipulate with gloves on. In fairness, they are a bit bulky but the large pullers are a big advantage in bad weather.

Fjallraven Bergtagen Eco-Shell Jacket Front Pockets.jpg

Other than that, the features are pretty similar to the Keb Eco-Shell Jacket and most other high-quality shells: two pockets on the front with roomy inside pockets for GPS or phone, Velcro-adjustable sleeves and a draw cord-adjustable hem. Large ventilation zippers on the side prevent overheating.


A few omissions make it clear this is a more hard-core jacket: no sleeve pocket (why would you need a ski pass in the back-country?), no cord hole for your headphones, and no inside pocket. You’ll only hear the wind howling in this one. Due to the fact that it is tougher, it is also a little bit heavier than the Keb Eco-Shell – but the weight penalty is barely noticeable: about 30 grams in a similar size.

Fit

Roomy but articulate. A thin down jacket will easily fit underneath but it is not bulky when only wearing a t-shirt. Fjällräven jackets tend to be roomy. If you know your sizing with their stuff you can stick to your normal size but if you’re new to the brand you might want to size down. The hem is quite long, which is nice in bad weather as it offers ample wind and moisture protection, and protects fleeces and down or synthetic layers from moisture. The sleeves are long, as is generally the case in climbing oriented jackets. It’s a necessity for me as I have rather long arms for my overall height.

Fjallraven Bergtagen Eco-Shell Jacket Size Tag.jpg

Details

Fjällräven is a brand with its own quirks and design philosophy. This is most apparent in general things such as colour choice (compared to most household outdoor brands their palette is quite subdued) and in some of the design details. For example, while most brands tend to go with pit zips to offer extra ventilation, Fjällräven is steadily banning this from their line-up, instead opting for core ventilation zips placed along the entire side of their shell jackets. This has a number of advantages: one, it offers better ventilation as your body generates most of its heat at the core. Two, they are not blocked by backpacks, whereas pit zips tend to be closed off by shoulder straps, and three, they can double as access to the pockets of midlayers worn underneath. This makes hand pockets on the outside unnecessary, reducing bulk and weight.

Fjallraven Bergtagen Eco-Shell Jacket Vent Zips.jpg

Another quirk is their obsession with double zippers. It’s hard to find a jacket without a zipper that can open from the bottom up. This is annoying and nice at the same time: annoying because they can be a little finicky to close, nice because it makes for an extra ventilation option. It also necessitates the push button at the hem to make sure it does not open up by itself.

Fjallraven Bergtagen Eco-Shell Jacket Double Zipper Bottom Push Button.jpg

Other than that, some things stand out: the mesh pockets inside the chest pockets are roomy, roomier than on the brand’s other shell choices. The hem drawstring does not have a garage, making sure it can be adjusted easily on the fly while wearing a backpack or harness (but also making it more noticeable and a snag hazard). The best detail in my opinion is that the Velcro tabs on the sleeve cuffs are sewn into the material, as opposed to the industry standard of a strip of Velcro sewn onto the sleeve. This helps make them longer lasting, and might prevent the build-up of snow on the tab in heavy weather.

Fjallraven Bergtagen Eco-Shell Jacket Hem Draw Cord.jpg

Furthermore, what makes Bergtagen unique in the Fjällräven line-up is the incorporation of RECCO reflectors into the garments. This enables Search and Rescue teams to detect the wearer via a small and flexible metal strip sewn into the material.

Fjallraven Bergtagen Eco-Shell Jacket Cuffs Velcro.jpg 

Usage

To be honest, so far I’ve only used this jacket around town, riding my bicycle to and from work in various weather conditions ranging from cloudy to continuous rain and sleet (biking through precipitation, especially sleet, is a good way to test a shell though: it increases the pressure on the material).

It does breathe much better than most other shell materials during the same activity, and most details work as advertised. The hood is roomy but adjusts well when not wearing a helmet, you can easily manipulate the zippers while wearing gloves and the pockets provide ample room for large phones, GPS and other necessities. Most importantly, the jacket is completely waterproof but breathes very well in most if not all cases. I’m looking forward to stress testing this jacket next Alpine season.


Pros

Tough 3-Layer RipStop face fabric

RECCO

Pliable and soft

Recyclable

PFC-free DWR

Completely waterproof

Very breathable

Hard-wearing reinforcements

Large zipper pullers

Large side zips

Spacious pockets

Roomy, fully helmet-compatible hood

Cons

PFC-free coatings are less water-resistant

Hem draw cords need to be tucked in manually

Just one slit for a headphone cord would have been a nice touch

Overall

If you need a hardwearing and exceptionally breathable hardshell jacket for back-country and alpine adventures year-round, and still want it to be somewhat good looking in daily life: look no further. This jacket has all the bells and whistles you might want – and none that you don’t. It will protect you from the elements no matter the circumstances, and will do so with room to spare for a helmet and necessary layers.  Fjällräven also makes a women’s version, obviously. Follow the links below for more information.

fjallraven-bergtagen-eco-shell-jacket-recco-label.jpg

With a recommended retail price of 579,95 Euros, it comes with a hefty price tag. But then, most of the jackets in this category are that expensive, if not more so. Design, construction and the materials used make them pricy – no compromises are made in terms of functionality. More than with any other type of gear, rainwear is you-get-what-you-pay-for. The Fjällraven Bergtagen Eco-Shell Jacket is, however, built to last, with careful attention to detail and the environment.

Further reading

https://www.fjallraven.com/bergtagen-eco-shell-jacket


https://www.fjallraven.com/bergtagen-eco-shell-jacket-w


Rab Firewall Pants Review

Introduction

Nobody I know likes (to buy) rain trousers. I wholeheartedly agree with that sentiment. Most of the time they are pretty much dead weight in your pack and, unlike hardshell jackets, they only become useful in the most persistent or heavy showers out there.

On the other hand, hiking or trekking in the rain can be quite a nice experience, but only if you are properly prepared and protected. And even in changeable weather you obviously need proper protection if you’re staying out longer – especially if you are camping out.

Rab Firewall Pants Front View.jpg

To be honest, I’ve put off investing in a pair of proper rain pants for a very long time. They were always on the list, but with limited cash flow (or, you know, more ‘important’ pieces of gear to buy…) they were never on the top. However, as I am planning more and more alpine activities in the near future, the need for proper full body weather protection grew, so I decided to finally cross this one off the list.

During the decision making process I had a number of demands. As I want to wear them only when they are necessary, long zippers, preferably full length ones, were top of the list. Pre-shaped knees, assisting in comfort while ascending and descending, were a close second. Third, weight. As it will likely spend most of its time in my pack, I want my rain gear to be light and packable. However, fourth, it needs to be able to handle a reasonable amount of abuse as well. Life in the mountains can be rough, as you probably know. Last, but certainly not least, was price. I am willing to shell out cash for quality gear, but as I planned to use these pants as little as possible, there were limits.

After some deliberation, trying, and shortlisting, I settled on the Rab Firewall Pants. I’ll tell you why.

Construction

Rab is quite well known for its down jackets. Its insulation layers and sleeping bags have seen use in various mountainous regions throughout the company’s 36-year existence. These are known to be excellently designed and produced pieces, and that quality carries over to a lot of Rab’s other gear as well. As one can expect in a 3-Layer shell product, all seams have been taped to ensure no water can seep through stitches. The three-quarter-length zippers are YKK Aquaguard, meaning they are waterproof and durable without the need for an outside storm cover (which means less bulk).

Rab Firewall Pants Taped Seams.JPG

The main material is Pertex Shield+, a 3-Layer shell material that is slightly stretchy, allowing for a very good range of motion. It has a rip-stop face and, as usual, a protective inner layer to shield the membrane from the most corrosive influences of salt and acid coming out of the human body in the form of sweat. The inside also is slightly brushed so it feels somewhat comfortably next-to-skin, which is a nice bonus considering a lot of rain gear, especially the more affordable trousers, are not a pleasure to wear without layers underneath.

I particularly like the careful way the functional details (more on those later) are married to the main material. For example, rivets are popped through the places where draw cords are coming out of their sleeves, ensuring durability. The same amount of attention has gone to some of the other small details, in various ways.

Features

Rain pants come in all shapes, sizes and weights – just like rain jackets. They can be over- or under-featured, or simply too heavy for your intended use. An example: Fjällräven, one of my favorite outdoor brands, has their full-featured hardshell Keb Eco-Shell Trousers. It’s a pretty awesome shell pant as long as you are wearing it – at 660 grams, it is quite a heavy one to put in your pack and carry around just in case. Some other pants are super lightweight, such as Salomon’s Gore-Tex Active Shell Pant. But that one lacks zippers on the side, making it impossible to don and doff without taking your shoes off – a big no-no when you’re in the mountains and the weather changes suddenly.

The trick, then, is to find a pair of rain trousers with just the features you need, no more, no less. The Rab Firewall Pant pulls this off (at least for me). It has a simple, adjustable draw cord waist adjuster on the inside of the elasticated gripper waistband. The side zips have three pullers, so you can create a custom length vent port on any particular height, or access pockets on the pants you are wearing underneath.

Rab Firewall Pants Threeway Aquaguard Zipper.jpg

The leg endings are adjustable, and have metal buttons so they stay closed at all times. Having just the necessities keeps weight down: these trousers weigh around 330 grams (exact weight dependent on size obviously) and pack down to absolutely nothing. Considering all the features and the quality of the material, that’s great – especially considering they’re not too steep in price.

Fit

For a pair of pants designed to be worn over other garments, these are quite tight. I wear size 29-30 waist jeans so I was expecting to fit either size small or medium for this. I got the mediums in the end, due to the fact that the smalls were quite tight around my thighs when worn with a pair of hiking trousers underneath. Now, I do have large upper legs for my waist size so if you’re somewhat more in proportion, your mileage may vary… Length is pretty much spot on, maybe a tad too long. But I think that’s due to me sizing up from a Small to a Medium when lengthwise I’m not the biggest guy around.

Details

There’s three I haven’t mentioned yet, all of which are nice but not strictly necessary, although they barely add weight so what the hell. All logos and letterings reflect light, which is nice considering the pants are black almost throughout. I make a point of wearing at least one brightly colored item of clothing at all times when I am in the mountains to remain visible no matter what happens so the reflective lettering is a nice touch but nothing more. Second, all the adjustment cords are bright red. This makes them stand out from the otherwise black look of the trousers so they are really noticeable, easy when the weather is bad. Last, each leg ending has two small loops on the inside to pull some cord under your boots. Neat, but kind of a hassle.

Rab Firewall Pants Adjustable Leg Ending.JPG

Rab Firewall Pants Gripper Waistband.JPG

Usage

I bought the Rab Firewall Pants before summer, making sure I had them before going on a climbing trip to the German Alps in Bavaria. I took them with me, but the weather was simply too good. Then again, due to their minimal weight and packing volume, they were not in the way either.

Last week, we had fifteen hours of continuous rain in Amsterdam, my hometown. Now, most people don’t see this as an inviting strolling opportunity, but to me it was the first time I got to try these trousers our for real. They performed as expected, keeping me dry from the outside while breathing reasonably well. To be honest, in any waterproof item, no matter how breathable, you are going to build up a sweat – it is imperative to wear quick drying performance base or mid layers at all times. That’s no different with these ones.

Could they have been better? Sure. There are two things I am missing. Full-length zippers would have been nice, but the three-quarter ones do the job almost as well. And a boot hook to replace the cumbersome loops currently sewn into the leg endings would make life easier if you want to prevent them to ride up (which, with high-top footwear, they don’t really do anyway). Otherwise, for EUR 169,95, these are pretty great lightweight rain pants.

Rab Firewall Pants Boot Loops.JPG

Pros

Long, waterproof zippers with three pullers

Simple draw cord adjusters at waist and leg endings

Pre-shaped knees

Lightweight

3-Layer Stretch main material

Reasonably priced

Cons

Zippers are not full-length

No proper boot hook

Overall

For the price, the Rab Firewall Pants are really great rain trousers. They do their job as well as can be expected, and most functional details are well thought out and executed. Due to their low weight and small pack size, they are not in the way when they are unnecessary (which, to be honest, is most of the time).

Rab Firewall Pants Button Leg Ending.JPG

The only few things that Rab could improve upon are the zippers (which would have been better if they were full-length) and the boot hook system, which would be better if it were an actual hook, as in the Fjällräven Keb or Vidda Pro Trousers. This would barely increase weight, but it would greatly improve usability. Nevertheless, I would advise to buy these if you’re looking for packable and comfortable rain trousers at not too high a price.

Further reading

https://rab.equipment/eu/mens/pants/firewall-pants


A little peace and quiet…

I’ve been a bit too quiet to my liking the last few weeks. That’s mostly because I’ve been preparing for a trip and working my day-job a lot. Next week I’ll step off to the German Alps to do a bit of Via Ferrata and mountain walking. I’m really looking forward to it!

Expect updates as soon as I’m there, and pics on my facebook and instagram feed as well!

My First Anorak Review: Tilak Odin Ventile Jacket

Overview

What’s your favorite do-anything jacket? Is it a trusty Gore-Tex Pro-Shell? Or maybe one made out of those newer membranes like Eco-Shell or eVent, or maybe even a NeoShell? To be perfectly honest I don’t really have one. I love waterproof-breathable fabrics because they are just that: waterproof and breathable. I hate them because they are relatively fragile compared to non-waterproofs, and because even the most breathable hardshell out there has its limits in terms of ventilation. I own two proper waterproofs at the moment: a Fjällräven Eco-Tour Jacket, and an Arc’teryx Alpha FL. Both have their qualities and when Thor drops the hammer (figuratively) they do come out of my rucksack. But I like softshell materials a lot more, because they are more pliant, much more breathable and much tougher than any waterproof out there. One downside: water will seep through eventually…

Enter a much older player in the ‘technical fabric’ game: Ventile.

Ventile is a fabric first developed during WW2 for military applications. Up to that time there was really only one way to make a garment actually waterproof: rubber. This approach has some merit: it is super durable. Hence, you can still see these ‘rain slickers’ in use with fishermen as salt water tends to ruin everything else pretty quickly, and they even had somewhat of a fashion revival in recent years. As a technical performance fabric though, it is downright horrible. They’re extremely heavy and terribly sweaty, so that rules them out immediately.

Another way of making stuff at least water repellent is waxing it. Some brands, in various ways, still make extensive use of this technique: Barbour, for example, uses a fatty and heavy wax to make their fabrics highly water resistant. Fjällräven uses a blend of paraffin and beeswax to make their polycotton blends water resistant while keeping weight down so it is still usable for outdoor pursuits. It’s a relatively simple process, and wax is easy and environmentally friendly to produce and use.

Ventile takes a different, and very unusual approach. At its core, it is a tight-weave fabric made from the top two per cent of the world’s cotton crop. The material swells up when water hits the surface and that makes it highly water resistant. This ensures that, when the material is dry, it has the comfortable and soft feel of cotton, but when wet it has the performance of a waxed jacket. In double layer garments it can even be completely waterproof – all without a layer of wax or a technical membrane.

Tilak Odin Ventile Wet.jpg

The downside is that the material is pretty hard to make. It requires a high-quality cotton crop and a fine weaving process. Therefore, clothing made from Ventile can be relatively expensive. However, when you realize what it can do compared to pretty much anything else out there, you definitely get your money’s worth!

Okay, that introduction was longer than I wanted it to be, but whatever. The reason I’m writing this review is because a few months ago I wanted to buy a good performance anorak. I like the pullover style they have and the performance feel of many of them. I was also eager to try a new material. In the end I found the Tilak Odin Anorak and fell in love with the look and features immediately. Actually buying one though was harder. In the end I found the brand itself willing to advice on fit and ship one over to me. Good service!

I was unable to find a good English-language review of the garment so I took it upon myself to write one. A word of warning: this will be a long one.

Construction

I hadn’t heard of Tilak before I found this jacket but after doing my research, I knew immediately that they know what they’re doing. It is a Czech performance apparel company mostly geared towards mountaineering pursuits. They still design and produce all of their garments within the Czech Republic, a country known for its high-quality sewing industry.

Tilak Odin Taped Threading.jpg

That knowledge shines through when looking at the Odin Ventile Jacket. I haven’t seen this much attention to detail in anything but Arc’teryx gear. The stitching is superb throughout. I haven’t found a single thread poking out anywhere. High wear areas, such as the cuffs, hem and brim have a double layer of fabric, the second inside layer being a lightweight polyamide. The cuffs and brim have also been laminated, giving them some rigidity so they are easily handled and grabbed. The embroidered logo is a nice touch as well, not only from an aesthetic point of view: it has been laminated on the inside so no water will seep through the stitching! YKK zippers are in use throughout, and the main front zip is an YKK Aquaguard zipper, laminated and taped on the inside to prevent water seeping through. All in all, one of the most well constructed pieces of gear I have ever seen or owned.

Features

The Tilak Odin Ventile Jacket is a clean looking jacket but it sure is feature-packed! The hood is fully adjustable, with a Velcro tab and one-hand pull cord on the back, and the usual two pull cords on the front. Its brim is laminated to keep rain and wind off your face. The hood is also somewhat helmet compatible. I tested it with a Black Diamond Half-Dome, not exactly the smallest one out there. It worked for me, but it is not as good as some of the climbing hoods out there, such as the Arc’teryx storm hoods or the Rab helmet compatible hoods.

Tilak Odin Kangaroo Pouch Inside.jpg

Pockets-wise, you won’t be disappointed. Aside from the large kangaroo pouch, which has a nice divider inside as well, you get a left-arm pocket, a small pocket in front of the kangaroo pouch, and two zippers to enter the large hand warmer pocket on the lower front. The main kangaroo pouch has a hole for comms cords or headphone cables and there’s a loop for the cables in the hood. A nice touch, and I especially like the contrasting color on the cord loop in the hood.

Tilak Odin Inside Hood.jpg

The two side zips serve as ventilation ports, and one can be opened fully to help donning and doffing. These zips are also slightly placed forward to ensure comfort while wearing a pack. The fully open zip is secured with a single button on the left lower side so you can open the zip completely without your jacket flapping about like a flag in the wind.

Tilak Odin Side Zip.jpg

The hem is adjustable through a single one-hand draw cord at the right inside. The draw cords throughout are worth a mention in their own right. I really like the one-hand design and the way they are there when you need them, but unassuming when you don’t. Only the one at the hem could have been smaller in length, but that is something a small knot can solve.

Tilak Odin Hem Drawcord.jpg

The cuffs are nice as well. They are laminated and long, so they’re easy to grab and adjust, with Velcro of course. They also have a slightly different color from the rest of the jacket so they are noticeable. They are eccentric though: most jackets have their cuffs running inside-to-outside. These are the other way around. It’s weird at first but once you’re used to it, it actually makes a lot of sense. It makes adjusting them on the fly much easier, especially while wearing gloves.

Tilak Odin Cuff Adjuster.jpg

Fit

I would say the Tilak Odin Jacket is generous in cut. I have a size Medium and at 71kg and 1,78m with an athletic build I have enough room to layer warm winter stuff (down jackets) comfortably underneath. It is not so big that it becomes completely unusable in the summer though, although you will have some extra room of course. Due to the cut it is a very good year-round jacket when you wear the appropriate stuff underneath. It does, however, present some problems when taking part in more technical activities such as mountaineering, especially in summer. Due to the generous cut, it can be hard to see your harness sometimes, so attaching and detaching gear can be an issue. This is mostly a problem while wearing thin layers underneath, but it did lead me to decide not to take it on an alpine route this summer, opting for my Arc’teryx Acto MX instead.

Details

Most functional details have already been mentioned but I also like the aesthetic ones. All the logos are embroidered, and laminated. There is the brand logo on the front, the red Tilak dot on the back of the hood, and then there is the black-on-blue Odin Ventile on the left sleeve. All of these give the jacket a sleek look, all while remaining performance-based in DNA. It’s a really well done combination.

Tilak Odin Outside Hood.JPG

Usage

To be perfectly honest, the Tilak Odin Jacket is not going to be the do-all jacket I thought it would, but that is only because it is slightly too bulky to wear during climbing to use safely – at least for me. Other than that, it is perfect. Trekking, hiking, cycling, everyday use… This jacket does it all. And the Ventile material works wonders, without any need to regularly reproof or wash. It withstands so much water that it makes my waterproofs almost unnecessary. I say almost because at a very persistently rainy day water will eventually start to leak through the breathability-improving but seeping stitches. Another point worth mentioning is that soaked Ventile becomes heavier and a lot denser than dry Ventile. It can almost feel like cardboard. If you’ve ever worn a thoroughly waxed Fjällräven jacket, you know the feeling. This is not much of an issue for me but I imagine that it might be for somebody else.

Pros

Clean look

Functional details

Ventile is virtually waterproof

Fully windproof

Relatively maintenance free

Hardwearing

Great construction

Roomy fit but clean cut

Cons

Only one draw cord at the hem

Too roomy for technical climbing

Ventile becomes stiff when soaked

Overall

For most purposes, this is a great jacket. The Tilak Odin Ventile Jacket looks clean enough to use as an everyday jacket, but it offers enough functionality and weather protection to take it on almost any trip on almost any day. It looks cool, it feels super comfortable and is highly durable. It makes your waterproofs last a lot longer because you will barely have to or want to wear them any more so in the long run it will save you a ton of money as well.

Tilak Odin Kangaroo Pouch Outside.jpg

Just don’t have an elaborate hair-do though – or take care products wherever you go. The choice is yours…

Further reading

http://www.tilak.cz/en/odin-jacket

Edit: I received a request for a picture while wearing it. This is me, 1,78 at 72kg wearing a size medium:

IMG_4483.jpg


Footwear Frenzy PT 2: Hanwag Friction GTX

Overview

During one of my prep sessions for a recent winter trekking trip to Skuleskogen National Park in Sweden I discovered that my waterproof trekking boots were as waterproof as a cheese grater. Fair enough, in my army years they really took a beating and I guess that was to be expected after five years of heavy use. Nevertheless, wet feet in cold environments can cause so many horrible problems that I really needed to invest in new boots. Because I want to do proper mountain work in the near future I opted to widen my range of outdoor footwear with a slightly heavier pair of boots. Boots I could take on alpine excursions, without being to stiff for difficult treks.

The middle ground between these two would be a good C or light D category boot. These are stiff, crampon compatible boots that still have a little bit of sole flexibility in them, so you can also use them for trekking through difficult terrain, preferably off-trail.

There is a particular boot in this category I have wanted to try for a while, but they seemed to be out of stock – they are due for an update. As luck would have it, my size suddenly popped back up into stock so I seized the opportunity and ordered them.

I’m talking about the Hanwag Friction GTX. Hanwag is a very traditional German boot maker. They are well known for their old-school double-stitched boots (where the sole is literally stitched to the upper using two rows of very heavy stitching, making these models almost indestructible). Hanwag also make very well thought out modern trekking and mountaineering boots though. The Friction GTX is such a boot. On top of being a well-made piece of equipment, I also like the look of this particular version.


Construction

C- or D-category boots are usually quite heavy and well made, which can be expected from boots costing upwards of 300 Euros. Construction wise it’s pretty much par for the course here as well, but Hanwag have really gone out of their way to make these as light as possible, without compromising usability in difficult and demanding terrain.

Where a lot of D-category boots consist of suede or rawhide leather, Hanwag has opted to make the Friction’s partially, in less exposed areas, out of Cordura and synthetic materials. Also, they have opted to let D-ring style lace eyelets on the lower part of the shoe go, instead choosing to have the laces go through Cordura eyelets sewn into the material. This has upsides and downsides. An obvious pro is less metal in the boot, saving weight. Another one is less metal rubbing onto either your feet or the Gore-Tex waterproof membrane, enhancing expected lifetime. Normally, boots start to soak through earliest at the metal eyelets. An obvious downside is that Cordura is easier to wear down than metal. However, due to the Click-Clamp lacelock system installed halfway down the laces, wear-and-tear on the Cordura eyelets is reduced to a minimum. Well-done Hanwag!

Hanwag Friction GTX Click-Clamp.JPG

Stitching is quality throughout, with two rows of stitching on high-wear areas, for example at crampon brace zones. The materials used are beefy as well, with a thick layer of rawhide leather covering most of the boots. This stuff will definitely stand up to abuse!

Features

Like most, if not all, boots in this category the Friction GTX comes with a high rubber brim around the upper, protecting the leather from scree and rock, and moisture. The outsole is beefy, with a Vibram Dolomite profile, providing grip on anything but ice. One annoying thing is that this wears down rather quickly, especially with use on tarmac. This, however, can be expected, as the shoes are so stiff that they don’t flex much during walking. The tarmac is tougher than Vibram rubber compounds so it wins that battle, regretfully. This problem is less noticeable in the Friction’s natural habitat – mountainous, mixed and difficult terrain.

Hanwag Friction GTX Vibram Dolomite.jpg

Hanwag Friction GTX Rubber Brim.jpg

The Friction GTX is equipped with a brace point for crampons on the front and the back, so in theory it should be possible to step into pretty much any model. Do make sure that yours fit before buying a pair though!

Hanwag Friction GTX Crampon Front.JPG

Insulation wise they’re far from the warmest boots, but I wouldn’t say that they are suitable for just about any summer outing either. I would say they are good enough for temperate climates, where temperatures can range from anything from -10 Celsius to about 15 to 20 Celsius. Insoles make a lot of difference here, though. I used them with a felt insole we tested for Woolpower. It was nice for winter use, but way too warm for 15 Celsius and above.

I especially like the Click-clamp lace-lock system halfway up the boot. This ensures that you can adjust the forefoot part of the laces to your liking and don’t have to fiddle around with that part of your laces every time you put them on. This saves valuable time and energy, especially in difficult terrain and weather. If you have a high forefoot, like I do, this also ensures that you can create enough space there without compromising on heel lock, because you can still pull the rest of the laces in really tightly.

 Hanwag Friction GTX Crampon Back.jpg

Fit

The Friction’s have a normal, if slightly roomy, fit. This is mostly done to accommodate foot swelling in warm weather and double-socking in cold weather. I have found that these boots are most comfortable while double socking with one thin and one thick sock. This creates an extra cushion, as these shoes are quite stiff and hard without it. This might be an individual issue, but if I only wear one sock I get a sore point at my left big-toe joint. That is quite peculiar, but totally manageable. The fit is also carefully worked through to make sure the boots stay comfortable during long crampon use.

Details

Most of these I have already mentioned, although some are worth going through. The boots are equipped with ventilation holes on the shaft, assisting with dumping excess heat (as much as possible though, these are obviously and understandably still covered by the Gore-Tex liner). They also feature multiple pull-tabs to assist donning and doffing: two on the tongue and one on the back of the shaft. The leather heel cap is protected by highly durable PU-coated leather, so crampon locks will cause less damage in the long run. All of these features make these Hanwag boots very durable and very usable. As for durability: all Hanwag boots feature a cemented construction, enabling resoling and prolonging their lifetime. The Friction GTX is no exception. This really makes them worth investing in and essential to maintain properly.

Usage

So far I have used them in difficult terrain in Sweden and tarmac in the Netherlands. I will not put them through much tarmac use anymore as that puts them up for a resoling job way sooner than my wallet would like – that said, for a D/C Category mountaineering boot they’re not half bad on the road.

During a winter trek in Skuleskogen, Sweden they were in their proper element. Scrambling up hills, navigating snowy and icy trails, plodding through bush… They have saved me from nasty falls multiple times. The Vibram Dolomite outsoles are beasts, providing grip on pretty much anything but ice. Wherever the trails were more like ice-covered slip-and-slides (all the time, more or less…), the Friction’s basically just became tanks, making sure I could traverse alternative routes over rock, snow and scree – it was awesome.

In June I will take them with me on a Via Ferrata trip to Germany. I hope they will perform as admirably there as they did in Sweden.

Pros

Built to last

Bright red – instantly recognizable

Grippy on anything but ice

Reasonably warm but not ridiculously so

Stiff but comfortable

High protective brim

Resolable

Click-clamp lace locks ensure custom fit

Cons

Vibram wears down quickly on tarmac

Only really comfortable with thick or double socks

Overall

So far I really like these boots. For such a stiff boot the Hanwag Friction GTX still feels quite comfortable while walking in flat or slightly angled terrain, but they can handle the rough stuff as well. Thanks to the Click-clamp lacing system the fit is somewhat customizable and it saves the lace eyelets as well. They also play nice with various crampons and gaiters. The outsoles are replaceable and have traction on pretty much anything except icy trails and ice-covered rocks. The look is nice and bright, and the technical details make them stand out. All in all a very well rounded boot suitable for difficult treks and entry-level alpine excursions.

Hanwag Friction GTX Overview.jpg

One caveat though: due to the fact that Hanwag is about to release an update this particular version will be difficult to get. The revised version will be slightly different in look, and will feature Hanwag’s Alpine Wide fit, which features a wider toebox to accommodate wider feet and to enable the use of thicker socks. If that’s your thing you might want to wait for a couple of months!

Further reading

http://www.hanwag.com/friction-gtxr

http://scottishmountaineer.com/hanwag-friction-gtx-boot-review/


Gear Review: Patagonia Performance Better Sweater

Overview

I’m a sucker for hooded jackets, whether they’re hardshells, softshells, puffies or fleeces. There’s something about them. The ability to snuggle up into their hoods when the wind picks up or the temperature drops is great. Hoods are awesome. However, when you’re wearing multiple layers of clothing (as I always do in the cold months of the year, winter parkas are for suckers) they can get too much in your face – literally.

I have been looking for a great non-hooded fleece midlayer for a while, especially since I purchased a down vest last year. The vest’s collar is so massive and comfortable that wearing a hoodie underneath kind of sucks. I couldn’t find the right one, but with its update to a tried and true classic Patagonia has nailed it. I was looking for something with a classic and casual look, while also being able to perform when moving about. Most knitted fleeces tend to be bulky or lack range of motion. They’re warm, so that’s nice when you’re just hanging about, but when the pace picks up their downsides become annoying. The Patagonia Performance Better Sweater solves that problem by combining fabrics and with a smart cut. I was unable to find that many extensive reviews of this revised classic so I decided to write one myself.

Construction

As can be expected from a reputable brand such as Patagonia, construction is decent throughout. Flatlock seams make sure there is little risk of chafing, the patterning on the stretch side panels ensures great range of motion and the sleeves are patterned in such a way that your jacket will not ride up when sticking your arms above your head. YKK throughout gives the zippers the best possible start in life. No cold wind will creep through the elasticated cuffs on the sleeves and hem, while they are not so tight that they become uncomfortable. All in all this is a well-constructed piece of clothing with attention to detail.

IMG_3184.jpg

Features

Compared to the classic Better Sweater (of which I like the look but not the cut and functionality) the most important features are without a doubt the Polartec stretch fleece side panels running from the hem all the way to the sleeve cuffs. This gives the wearer a range of motion unheard of in knitted-surface fleeces. It also ensures that this fleece can be worn tightly over a thin base layer without getting annoying or uncomfortable, making it very well suited for layering. Other than that it is fairly straightforward. Raglan style sleeves ensure further range of motion in the arms. Three mesh-backed pockets can hold essentials or may act as vent ports if you run hot. The collar is lined with microfleece for added comfort against sensitive skin. This fleece has nothing but the essentials and that’s why I like it. There’s only one thing missing although it hasn’t annoyed me so far – a chin guard would have been a nice touch.


img_3185 

Fit

While most knitted-surface fleeces tend to be boxy, this is definitely a slim fitted one, although I admit choosing between a small and medium was a tough one. Seeing as I want to be able to layer it even with cold-winter gear I chose a small. The sleeves are fairly long, so the fit is definitely tuned for an athletic build. If you’re either very muscular or short and stocky this might not be the fleece for you. I’m 1,78m at 71kg and a small is tight but comfortable for me. The sleeves are just about long enough although 1 or 2 extra centimeters wouldn’t have hurt. Obviously I could have gone with a medium but that was too big on the body and too long on the hem when combined with climbing hardshells such as the Arc’teryx Alpha series jackets.

IMG_3187.jpg

Usage

This fleece is suitable for a whole range of applications. Want to take a stroll through town? No problem. Want an extra layer of warmth on your summer trek? Check. Do you need to wear something underneath your shell? Yes, sir. Is your synthetic puffy or down vest slightly too cold on its own? It can solve that problem too. Due to its tight fit and stretchy side panels it can perform in a wide variety of circumstances and during various activities. A true all-rounder indeed.

img_3186

Pros

Tight fit

Performance cut

Stretch side panels

Flatlock seams

YKK zips

Classic knitted-surface look

Cons

No chin guard

Overall

If you have an athletic build and are looking for a classic-looking performance fleece, then look no further. This is a great layering piece in a variety of circumstances and differing climates. A workhorse you can take trekking, climbing or hiking, but that is still able to look the part when wearing it to the pub at night. Also comes in a hooded version if that’s what you’re looking for.

Further reading

http://eu.patagonia.com/enNL/product/mens-performance-better-sweater-fleece-jacket?p=25955-0

http://www.backcountry.com/patagonia-performance-better-sweater-fleece-jacket-mens?s=a


Book review: The Power of a Cautionary Tale

Into Thin Air by Jon Krakauer

During our recent hiking trip though the Julian Alps I was amazed by the sheer beauty of rock. I have been an avid hiker and trekker as well as an occasional scrambler for about five years now, but walking on small ledges, climbing short rock routes and the very sense of accomplishment reaching a high vantage point gave me, has kindled my interest in alpine mountaineering. I think it has to do with the fact that climbing in such a way is very much a thinking man’s game: while hiking up a steep hill can be tough work, it takes nothing more than perseverance and stamina. Technical climbing is slower, yes, but that has to do with the fact that every step has to take into account the next one.

9781447200185.jpg

So since we came back from Slovenia I have done a few things: first, I have started gearing up for a Via Ferrata trip. It’s obviously not the most technically demanding form of climbing but I figured that would be the most logical next step. Also, as we saw in Slovenia, it adds just a bit of safety to otherwise very exposed sections of some trails. I have some experience using this type of gear and the rope work it demands so I think this should be my entry into the vertical world.

Second, I like to read, so I acquired a copy of Jon Krakauer’s mountaineering classic Into Thin Air.

Krakauer likes to go into detail – supposedly he is still obsessed with the exact cause of death of Christopher McCandless, the main subject of his other bestseller Into The Wild. That same amount of rigor is applied here.

Into Thin Air chronicles the writer’s own experience while taking part in a guided expedition to the summit of Mt. Everest in 1996. That year was a particularly unlucky one for Everest climbers.

As the highest mountain on earth, Everest was first officially summited in 1953 by Tenzing Norgay and Edmund Hillary. Its peak is at 8848 meters above sea level. While there are more technically demanding mountains, the fact that it is the world’s highest point attracts many climbers – experts and relative novices alike. Especially since the advent of commercial guided expeditions and the invention of supplementary (bottled) oxygen, the technical capabilities of the climber in question have become less important to success.

Indeed, according to Krakauer, climbing mountains in that way has become exceedingly controversial in the professional mountaineering world due to the fact that to many purists, it takes the sport out of it. That may be a subjective feeling but the fact is that it has become much easier, and a lot more popular, to get into mountain sports in general. One of the negative effects is that this also attracts a fair amount of underprepared individuals – in the high alpine as well as your local hills.

At its core, Into Thin Air is a gripping personal account of a complicated disaster chronicling the terribly bad luck befalling the 1996 Everest Expedition organized by Adventure Consultants, led by Rob Hall. The writer was present for Outside Magazine, commissioned to report on the growing commercialization of high altitude mountaineering. During the expedition, extremely bad weather, slipping time frames, a number of underprepared or overzealous climbers, a short climbing season leading to a lot of traffic, some regretful decisions, and extreme altitude created a situation in which something, at some point, had to go wrong. At such great heights, even the smallest mistake may lead to complete catastrophe.

Even though the reader will have a rough idea how the book ends – it chronicles a disaster after all – Krakauer’s writing style and attention to detail grabs one’s attention and doesn’t let go. That year, Everest was inhabited by a group of colorful and often very different personalities. One of the book’s strong suits is that it doesn’t play the blame game – while some individuals made strange or bad decisions, this is always presented in the context of the extreme environments they were made in. Most importantly, Krakauer is not above second-guessing his own actions – were they slightly different, maybe the events would have been less disastrous.

While the book is not exactly new, it was an interesting read for me personally. To me, it read as a cautionary tale. Mountaineering at any height is an inherently risky pursuit. A 40-meter drop has the same effect at 4000 meters, as it has at 1000 meters. But at extreme altitude weather gets worse, temperatures drop and most importantly, a human’s mental faculties go down due to oxygen depletion and ailments caused by extreme altitude. This all played a huge part in the events laid out in the book.

Climbing is an inherently crazy pursuit. But the main lesson of this book, for me, would be to pick your battles carefully. If you want to go vertical, be sure that you have the necessary skill and experience for the task at hand. This may sound like a no-brainer but history is full of people neglecting this simple truth.

Stay safe.


Footwear Frenzy: Salomon Quest 4D Forces Review

Overview

As any other gear junkie I have given up the hope of ever finding that one pair of shoes capable of doing it all. A Jack-of-all-trades does not exist. Your low-cuts will be unable to go into rough or wet terrain; your trekking boots will be unnecessarily heavy and stiff on tarmac or easy trails; and your backpack will become uncomfortably heavy while wearing shoes with too little arch and ankle support. Then there’s the never-ending discussion of waterproof vs. water-repellent – and then I’m not even mentioning mountaineering boots.

I work for an outdoor company and served in the military before that and therefore I have collected my fair share of outdoor footwear throughout the years. I own two pairs of low-cuts, two pairs of mids and two pairs of high-cut trekking boots. None of these are up for anything, and only one pair comes remotely close.

That would be the Salomon Quest 4D Forces. Designed as a full-mission profile boot for military use in warm and dry climates, this boot has a lightweight construction, while still being relatively high-cut and offering enough rigidity and torsional strength for a wide variety of terrain and loads. Its look and build are slightly more aggressive and sporty than many of its German competitors, which has some advantages and disadvantages – but more about that later.

Construction

The main components of the upper are rubber, suede leather and 1000D Cordura. The sole is made from a sandwich of rubber layers, mostly molded EVA and Contagrip outsole material. In the upper, the suede leather and Cordura work together to create a surprisingly water-repellent outer layer. Hiking through very wet terrain in Abisko, Sweden, I was genuinely surprised with the time it took for my feet to get slightly wet. Granted, I was wearing waterproof gaiters at the time but these did not cover the lower front part of my feet. And the lack of Gore-Tex or full leather upper also made sure that my feet could ventilate excess heat and moisture effectively – meaning they were dry relatively fast.

IMG_2694.jpg

The sole is sturdy enough to give support and stability on rocky terrain, but flexible enough to be comfortable. The molded EVA and Contagrip outsole give a large amount of suspension without going soft.

Now, there’s one main drawback to how Salomon and many other lightweight bootmakers make their footwear, and that is the lack of cemented construction. This is a very traditional and labor-intensive (and thus expensive) way of constructing boots in such a way that the upper is a completely separate part of the boot. This means that the sole can be replaced, giving the boot longer life and a better fit. With the Quest 4D, this is not possible and that is a true shame. Once the outsole has been used up, it is time to buy new ones and depending on the amount of use that might be quite fast, especially if you happen to be in the military.

Features

There are some important differences between the Forces and regular version of the Quest 4D, as military use often asks for specific details. The lace hooks have been replaced with loops. This ensures no wires, ropes or lines can snag into the boot’s laces – important during fast roping, parachuting or rappelling. The outsole has been slightly altered to make such activities easier. The mesh polyester on the regular version has been replaced with 1000D Cordura, a tougher and more water-resistant nylon variant.

IMG_2711.jpg

Other than that it has the same bells and whistles as most other trekking boots. A gusseted tongue, shaft loops to make donning and doffing easier, a rubber toecap to protect the leather against rock and scree, lace locks – and exceptional grip.

IMG_2712.jpg

Two features are relatively unique: they’re lightweight and flexible, while being relatively stable. These truly are get-up-and-go and almost as easy to wear in as a pair of running shoes. This is interesting because usually this means that large or heavy backpacks can become uncomfortable and problems with knees and ankles are bound to pop up sooner or later. I’m sure that above a certain weight that will also happen with these boots, but I was surprised at how well they got along with my 15kg backpack in rough Swedish terrain while ascending and descending.

IMG_2713.jpg

Fit

These boots have a normal, maybe slightly roomy, fit. My feet are slightly wider than average and with most brands I’m between UK 8 and 9, meaning I usually need an 8,5. I have owned a pair of Salomon boots before, which I got in 8,5. Those turned out slightly too small so I sold them. I got the Quest 4D in a size 9 and so far that seems to be spot on for me. My heels are locked in place and my toes have enough wiggle room without sliding sideways or forward. One thing I will say about the fit: the shaft is very aggressive. After only one day of use I decided to stop using the highest lace loops because I could feel my shins hurting. Skipping them solved that issue. Shin issues aren’t funny and should be avoided at all costs.

Details

Most details have already been mentioned. The most important reason for me to get these was the fact that they are more or less the only full-mission profile boots without Gore-Tex that Salomon makes. Gore-Tex has its drawbacks. It’s waterproof but that often comes at a price, especially in dry and warm weather, as the membrane’s air permeability only allows for so much water vapor to go through. I wanted lightweight and flexible, yet sturdy boots for summer use in the mountains. The fact that these are spacer mesh lined instead of waterproof is great. And when your feet do get wet, they ventilate well enough to quickly walk them dry.

IMG_2714.jpg

Usage

So far I have used these on day hikes, training rounds with intermediate-sized packs and a short overnight camping trek in Sweden. They performed well enough on all occasions, although I think they will truly shine during a summer cabin-to-cabin trek in the Alps, which my girlfriend and me will undertake next month. While I was positively surprised with how well they managed wet and rough terrain in Abisko, I would take a heavier boot for a longer trek there. They would offer slightly more stability and durable comfort than these Salomons do, even though they surprised me in the way they were able to handle themselves given the rough and uneven terrain 250 kilometers into the polar circle.

Pros

Lightweight yet sturdy

Flexible

Comfortable

Breathable yet surprisingly water-resistant

Snag-free lace loops

Strong outsole with grip on rough terrain

Ankle support

Cons

Outsoles cannot be replaced

Aggressive cut on the shaft

Lace loops and lacelock system take some time to get used to

Overall

These are a great pair of boots for those looking for shoes strong enough to tackle rough terrain every once in a while, but also like speed and agility. I would not recommend them for full-on mountain trekking but with an intermediate size (say 40-50 liters) pack in summer time or otherwise dry weather these will work great. They offer ankle support, flexibility and ventilation while being reasonably water-resistant and quick drying. A definite recommendation if they suit your needs. They are also available in a Gore-Tex version if you need waterproof boots.

Further reading

http://www.salomon.com/us/product/quest-4d-forces.html?article=381595

http://www.leafgear.com/en/salomon-quest-4d-forces.html